How to Clean Silver – Best Home Methods for Tarnished Jewelry
How to Clean Silver: Best Home Methods for Tarnished Jewelry
Silver jewelry accumulates tarnish over time, dulling its natural shine. Exposure to air and sulfur compounds causes silver sulfide to form on the surface, creating that familiar dark discoloration. Fortunately, proven home methods exist to restore brilliance without professional polishing services. The most effective techniques use everyday kitchen ingredients and require minimal effort.
Understanding the science behind these cleaning methods helps achieve better results. Electrochemical reactions, rather than abrasive polishing, can safely remove tarnish while preserving the metal beneath. Museums worldwide have adopted these non-abrasive approaches for cleaning valuable silver pieces.
This guide covers multiple techniques suitable for different types of silver items, from delicate necklaces to sturdy bracelets and rings. Each method includes step-by-step instructions, safety considerations, and practical tips for maintaining your silver collection long-term.
How to Clean Tarnished Silver at Home
Before diving into specific techniques, a quick overview helps identify which method suits your needs best.
Aluminum foil + baking soda
Baking soda paste
Mild soap solution
Toothpaste or salt
- The aluminum foil and baking soda method uses an electrochemical reaction to transfer tarnish from silver to foil, avoiding scratches entirely
- This technique is preferred by museums for cleaning valuable silver pieces without abrasive damage
- The process works safely on sterling silver, gold-plated items, brass, and copper
- Reaction speed increases with hotter water, more foil surface area, or longer soaking time
- Avoid using washing soda—its higher alkalinity can damage silver over time
| Method | Time Required | Materials Needed | Best Suited For |
|---|---|---|---|
| Aluminum Foil + Baking Soda | 5-30 minutes | Foil, baking soda, glass dish, tongs | Heavy tarnish, most jewelry types |
| Boiling Variation | 4 minutes active + cooling | Foil, pot, baking soda, salt | Stubborn tarnish, multiple pieces |
| Baking Soda Paste | 30 sec – 10 minutes | Baking soda, water, soft cloth | Spot cleaning, light tarnish |
| Toothpaste Method | 5-10 minutes | White toothpaste, soft cloth | Light polishing, quick touch-ups |
| Mild Soap Solution | 5 minutes | Warm water, mild dish soap | Regular maintenance, delicate items |
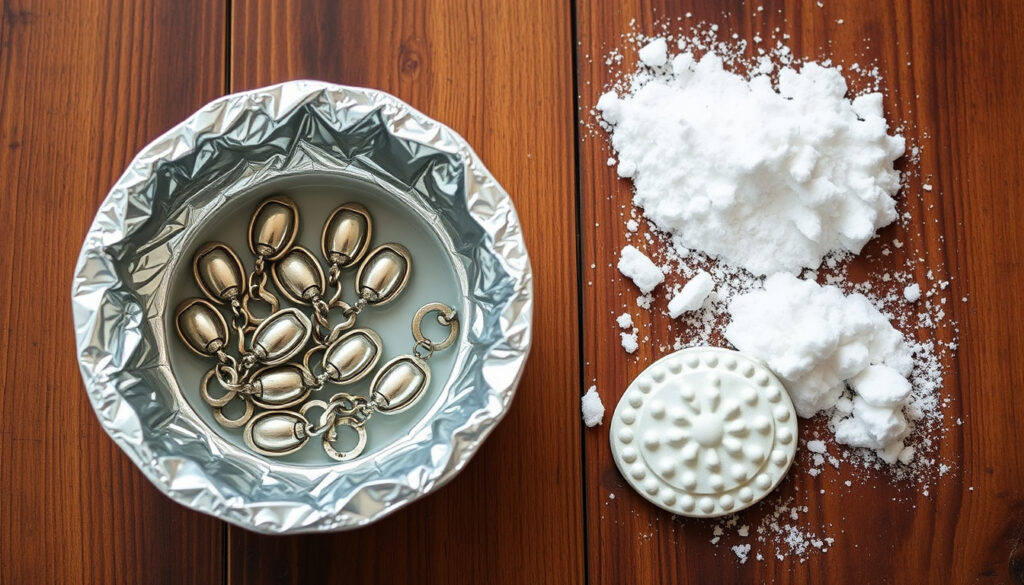
How to Clean Silver with Aluminum Foil
The foil method represents the most effective home technique for restoring tarnished silver. Unlike traditional polishing, this approach relies on chemistry rather than friction to remove discoloration.
The Electrochemical Process Explained
Baking soda creates an alkaline solution when dissolved in water. Aluminum foil serves as a sacrificial anode in this galvanic reaction. The foil willingly oxidizes instead of the silver, converting silver sulfide tarnish back to pure silver metal while the foil darkens in its place. This transfer mechanism ensures only the unwanted tarnish is removed, preserving the underlying silver layer.
Step-by-Step Instructions
Begin by lining a glass or metal dish with aluminum foil, placing the shiny side facing upward. Arrange jewelry pieces in the dish without allowing them to overlap. Bring water to a boil, then carefully pour it over the items until fully covered. Add approximately one to two tablespoons of baking soda, or roughly one cup per gallon of water. Stir gently to initiate the reaction, which produces visible bubbling as the process begins.
Allow pieces to soak for five to thirty minutes, depending on the severity of tarnish accumulation. As the reaction progresses, the foil darkens while silver items gradually brighten. For particularly stubborn areas, remove the item temporarily and gently rub with a soft sponge dampened in baking soda, limiting strokes to five or six per section to prevent over-cleaning.
Using tongs, carefully remove each piece and rinse under warm running water to eliminate any residue. Dry immediately with a soft cloth, buffing gently to achieve a natural shine without scratching the surface.
Avoid submerging gemstones, pearls, or thin silver-plated items in this solution. Repeated exposure may gradually wear down thin plating layers, eventually exposing base metals beneath.
Boiling Variation for Heavy Tarnish
For heavily tarnished pieces or when cleaning multiple items simultaneously, a stovetop variation proves more effective. Line a pot with aluminum foil, add the jewelry, and pour in water to cover items by two to three inches. Mix in one teaspoon of baking soda and one teaspoon of table salt, then bring the solution to a rolling boil for four minutes. The tarnish visibly transfers to the foil during this process, which may turn completely black.
Allow items to cool before handling, then rinse thoroughly and dry with a soft cloth. Note that table salt accelerates the reaction but may leave trace amounts of silver chloride on the surface, which buffs away easily. However, this salt addition should be omitted when cleaning plated silver items to prevent base metal exposure.
How to Clean Silver with Baking Soda
Baking soda serves as the active ingredient in the most effective silver cleaning methods, functioning as a gentle yet effective cleaning agent when used appropriately.
Baking Soda Paste for Spot Cleaning
When tarnish affects only specific areas or a full soaking setup proves impractical, a baking soda paste offers targeted cleaning power. Combine baking soda with a small amount of water to create a thick, spreadable consistency similar to toothpaste. Apply the paste to affected areas using a soft cloth or non-abrasive sponge.
For light tarnish accumulation, thirty seconds of contact time suffices. Heavier discoloration requires longer dwell time, up to ten minutes, though items should be checked periodically. After waiting, gently rub the paste across the surface using circular motions, applying minimal pressure to avoid scratching. Rinse thoroughly under warm water and dry immediately with a clean, soft cloth.
This method requires gentle hand rubbing, unlike the electrochemical foil technique which requires no physical scrubbing whatsoever. The paste works best as a supplementary treatment for isolated tarnish spots rather than overall piece restoration.
Why Baking Soda Works Effectively
Sodium bicarbonate creates an alkaline environment that breaks the bond between silver and sulfur atoms in tarnish compounds. This alkaline action softens silver sulfide, allowing it to release from the pure silver beneath. When combined with aluminum foil in the electrochemical method, baking soda enables a complete transfer process that actually restores silver rather than merely removing it.
Never substitute washing soda for baking soda. Washing soda (sodium carbonate) contains excessive alkalinity that can damage silver surfaces over repeated uses. Stick with standard box baking soda for safe, effective cleaning.
How to Clean Silver Necklace and Bracelet
Delicate chains and intricate bracelet designs require special consideration during cleaning to prevent damage to links, clasps, or decorative elements.
Preparing Chain-Style Jewelry
Necklaces and bracelets with linked chains clean effectively using the foil method, though tangled or knotted chains should be addressed beforehand. Untangle knots gently before cleaning to ensure all chain links receive exposure to the solution. The electrochemical process handles chains well provided pieces are laid flat in the dish without overlapping.
For necklaces with pendants containing glued elements or sensitive gemstones, remove the pendant if possible before treating the chain separately. If removal isn’t feasible, apply the baking soda paste method to the chain while protecting the pendant from moisture exposure.
Rinsing and Drying Delicate Pieces
After cleaning any chain-style jewelry, rinse thoroughly under warm running water to eliminate all traces of baking soda residue. Inspect links carefully, paying special attention to areas near clasps where residue commonly accumulates. Dry completely using a soft, absorbent cloth, then allow pieces to air-dry completely before storage or wearing.
Gently buff chain links with a soft cloth while holding the piece at an angle to prevent kinking. Never wring wet chains, as this weakens links and damages clasps over time.
Maintaining Your Jewelry Between Cleanings
Preventive care significantly reduces cleaning frequency and preserves silver brilliance longer. Store cleaned jewelry in anti-tarnish bags or lined jewelry boxes to minimize exposure to airborne sulfur compounds. Remove silver jewelry before swimming, exercising, or applying lotions and perfumes, as these substances accelerate tarnishing considerably.
Regular wiping with a soft jewelry polishing cloth after wearing helps maintain shine between deeper cleanings. This simple habit prevents tarnish from building up to levels requiring intensive treatment.
How to Clean Silver Without Aluminum Foil or Polishing
Situations arise where aluminum foil may be unavailable or traditional polishing proves undesirable. Alternative methods offer effective tarnish removal without these common approaches.
The Toothpaste Method
Standard white toothpaste—excluding gel formulations—provides mild abrasive action for polishing silver surfaces. Apply a small amount directly to a soft cloth and rub gently across tarnished areas using circular motions. The mild abrasives in toothpaste help lift surface discoloration without scratching when applied carefully.
This method works best for light tarnish and regular maintenance rather than heavy discoloration removal. For intricate jewelry with crevices, a soft-bristled toothbrush can help work toothpaste into detailed areas. After treatment, rinse thoroughly under warm water to remove all toothpaste residue, which can leave white streaks if allowed to dry on the surface.
Toothpaste cannot match the effectiveness of the foil method for heavy tarnish removal. Its mildly abrasive nature means it may leave very fine scratches visible under magnification. Always test on an inconspicuous area first and avoid using on valuable antiques or museum-quality pieces.
Mild Soap Solution
For regular maintenance of lightly worn silver, warm water combined with a few drops of mild dish soap provides gentle cleaning action. Soak pieces for several minutes, then gently rub with a soft cloth or brush to loosen accumulated dirt and body oils. This method removes surface contaminants but has limited effectiveness against established tarnish.
Rinse under clean warm water and dry immediately with a soft cloth. This approach works well as part of a regular cleaning routine but should be followed periodically by a more thorough treatment to address tarnish buildup.
Salt-Based Methods
Table salt acts as a reaction accelerator when combined with baking soda and hot water, though it produces less dramatic results than the full foil method. Dissolve one tablespoon of salt and one tablespoon of baking soda in hot water, then soak silver pieces for five to ten minutes. The slightly elevated alkalinity helps break down tarnish without requiring foil.
Be aware that salt-based solutions may leave trace silver chloride deposits on surfaces, which buff away easily but represent an additional step in the cleaning process. Omit salt entirely when cleaning plated silver to avoid base metal exposure.
Step-by-Step Process Timeline
Following a structured approach ensures consistent, reliable results when cleaning silver jewelry at home.
- Prepare materials — Gather baking soda, aluminum foil, a heat-safe glass or metal dish, tongs, soft cloths, and warm running water
- Line the container — Spread aluminum foil across the dish or pot bottom with shiny side facing upward
- Arrange jewelry — Place pieces flat without overlapping, ensuring each item contacts the foil directly
- Prepare solution — Pour boiling water over items, add baking soda (one to two tablespoons per cup of water), and stir gently
- Soak the pieces — Allow five to thirty minutes depending on tarnish severity while observing the foil darkening
- Check progress — For stubborn areas, remove temporarily and apply baking soda paste with gentle rubbing
- Remove carefully — Use tongs to extract pieces, avoiding burns from hot solution
- Rinse thoroughly — Wash each piece under warm running water to remove all residue
- Dry completely — Pat dry with soft cloth, then air-dry entirely before storage
- Buff and store — Gently buff for additional shine, then place in anti-tarnish storage
Myths Versus Facts About Silver Cleaning
Conflicting information circulates regarding silver care. Distinguishing established facts from common misconceptions helps protect valuable pieces.
| Claim | Verdict | Explanation |
|---|---|---|
| Toothpaste is safe for all silver jewelry | Partially True | Works for light tarnish but mildly abrasive; avoid on antiques or intricate pieces |
| Aluminum foil method damages silver | False | Electrochemical process only removes tarnish; no metal removal occurs |
| Salt always helps cleaning | Misleading | Accelerates reaction but may leave silver chloride; omit for plated items |
| Washing soda substitutes for baking soda | False | Washing soda is too alkaline and can damage silver; use only baking soda |
| Commercial polishes are necessary | False | Home methods match or exceed polish effectiveness without harsh chemicals |
Understanding Why Silver Tarnishes
Silver tarnishing represents a natural chemical process rather than a defect in the metal itself. Understanding this reaction helps prevent excessive buildup and informs appropriate cleaning frequency.
Silver reacts with sulfur compounds present in the air, on skin, and in various environments to form silver sulfide—the dark brown to black discoloration commonly called tarnish. This reaction occurs more rapidly in humid environments and when silver contacts substances containing sulfur, such as wool, rubber bands, latex gloves, and certain foods like eggs and onions.
Body chemistry also affects tarnishing rates. Some individuals find their silver jewelry tarnishes more quickly due to higher sulfur content in their skin oils or prescription medications. Tracking how quickly your pieces tarnish helps establish realistic cleaning schedules tailored to your specific circumstances.
Proper storage after cleaning remains the most effective prevention strategy. Anti-tarnish strips, bags, and jewelry boxes with velvet lining all help slow tarnish formation by reducing silver’s exposure to airborne sulfur compounds. Regular wearing actually helps maintain shine for many people, as skin oils provide a thin protective barrier against tarnish formation.
Expert Recommendations and Sources
Professional jewelers and conservation specialists have extensively tested these home methods, providing reliable guidance for silver care.
The aluminum foil and baking soda technique represents the gold standard for home silver cleaning. Its electrochemical approach aligns perfectly with professional conservation practices used in museums worldwide.
— Arm & Hammer Household Care Guides
Sources consulted for this guide include household care experts at Arm & Hammer, conservation specialists at the Ganoksin Orchid community, and practical demonstrations from jewelry care professionals. Additional references from The Guardian’s eco-friendly cleaning coverage and major jewelry brands like Tiffany & Co. provide complementary perspectives on silver care best practices.
Summary and Next Steps
Cleaning silver at home proves straightforward with basic kitchen ingredients and minimal equipment. The aluminum foil and baking soda method offers the most effective approach for heavily tarnished pieces, while baking soda paste serves well for spot cleaning and maintenance. Alternative methods using toothpaste or mild soap provide gentle options suitable for regular care routines.
Success depends on matching the method to your specific needs—heavy tarnish requires the electrochemical foil approach, while light maintenance benefits from gentler alternatives. Always consider the type of silver (sterling versus plated) and any gemstones or decorative elements when selecting a cleaning method.
For those interested in related topics, understanding gold price per gram UK provides context for jewelry investment decisions, while exploring charity shops near me can yield quality silver pieces at accessible prices requiring basic cleaning restoration.
Frequently Asked Questions
What is the best silver cleaner for home use?
Baking soda combined with aluminum foil and hot water represents the best overall home silver cleaner. This electrochemical method effectively removes tarnish without abrasives or harsh chemicals, making it safe for most silver jewelry types.
Is toothpaste safe for silver?
White toothpaste can clean lightly tarnished silver but works through mild abrasion rather than chemical reaction. Avoid using on antiques, intricate jewelry, or pieces with heavy tarnish. Always test on an inconspicuous area first.
How long does it take to clean silver with baking soda?
Standard soaking requires five to thirty minutes depending on tarnish severity. Baking soda paste applications need thirty seconds for light tarnish up to ten minutes for heavy buildup. The boiling variation requires approximately four minutes of active cooking plus cooling time.
Can I use regular baking soda instead of specialized silver cleaner?
Standard household baking soda works excellently for silver cleaning. Avoid washing soda or other alkaline cleaners, as these may damage silver surfaces. Standard box baking soda provides the correct alkalinity level for safe, effective cleaning.
What should I avoid when cleaning silver jewelry?
Avoid abrasive cloths, paper products, harsh chemicals, and rough scrubbers that can scratch silver. Skip this method entirely for gemstones, pearls, or thin-plated items. Never use washing soda in place of baking soda, and avoid salt for plated silver.
How can I prevent silver from tarnishing?
Store silver in anti-tarnish bags or lined jewelry boxes, remove pieces before swimming or applying cosmetics, and wipe with a soft cloth after wearing. Regular light cleaning prevents tarnish from building up to levels requiring intensive treatment.
Does the aluminum foil method work on gold-plated silver?
The foil and baking soda method works safely on gold-plated items, brass, and copper alongside sterling silver. However, use caution on thin plating layers and avoid repeated treatments on pieces where the plating may already be wearing thin.
More related posts
 Cast of Just Good Friends – Full List, Seasons and Actors Now
 Grow a Garden Codes – Active List April 2026
 Buy Mounjaro Online UKMeds.co.uk – Prices from £157.99, Stock and Delivery Guide
 Brunch Places Near Me – Top Rated Spots in San Antonio, Burleson, Houston
 Price of Gold Per Gram UK – Live Rates and Charts
 8 Seater Dining Table – Sizes, Styles and Buying Guide
 Cast of Peaky Blinders – Full Actors List and Seasons Guide
 11 Stone in Pounds – Exact 154 lb Conversion Guide
